Background: context for decision making
In the browser-based world of yesteryear, the ‘referer’ (yes, intentionally misspelled) header is something that everyone takes advantage of. Built into the protocol, you have the ability to know exactly where your user came from, customizing their experience or recording it for analytics. Furthermore, addressing and parameter passing is seamlessly integrated into the standards that power the web as we know it today. All of this was lost in the transition to native mobile apps, which has made linking to apps incredibly challenging. While our team was working on our app back in 2013, we struggled like crazy with this. It was mind boggling that no one had solved it yet, so we ended up building what we believed to be the perfect instantiation of the ideal link for native mobile apps.
Before we knew it, this linking tool was growing much faster among our friends than any of our apps, so we decided to focus on it full-time. One of the choices that we made early on was to embody as many of the characteristics of open source software that we could. We believed that the mobile ecosystem would be a much better place if this technology existed pervasively, so we made it free and tried to open source as much as we could. The portions that are still closed are fully explained in all the documentation, and we’ve made a point to try to incorporate as many of the community’s suggestions as they come.
Enter our new documentation portal. The Branch linking service has grown substantially in scope and complexity over the last year. With hundreds of developers signing up to use it every week, we find ourselves answering far too many integration questions than we’d like for what we believe to be a self-service tool. Not only that, we know that we can’t write the perfect documentation, try as we might. Since a majority of the features that Branch has today have been a result of community contributions, we knew we had to open source our documentation portal. We’re excited to share this with you today.
You can see the project at: https://github.com/BranchMetrics/documentation
Jekyll: because it’s awesome
Since the entirety of our previous documentation pages were in markdown and hosted on Github, we were naturally drawn to Jekyll (jekyllrb.com) as our generator. It a super simple to use, extremely flexible, static site generator. We like hosting as much content as we can on our CDNs, mainly because we live and breathe performance all day. Developer portals, with mostly static content, deserve to be hosted on a CDN. The less dynamic content, the better, so that developers aren’t waiting as they frustratingly try to debug their issue.
Using Markdown and Liquid templates, even a non-technical marketer could write a guide on our documentation portal. It’s very easy to contribute content. And, since the content is written in Markdown, our previous READMEs port right over to the new project, making migration incredibly simple (see /references ).
Beyond ease of use, Jekyll+Liquid is also very extensible. We’re big proponents of the React framework for front-end component development, and we were able to come up with a technique to incorporate pre-built React components into our static site. More about that in a bit.
Recipes and ingredients: organizing content for efficiency
One of the most annoying things about writing documentation is the amount of repetition in explanations. If you have to make a change to a technique or a method name, you must change it in so many different places. We’ve forgotten to update sections of the documentation far too many times.
To solve this, we logically broke down our documentation into two high-level categories: recipes and ingredients. We thought of recipes as guides that would describe how to build a feature or accomplish a task. Recipes would then be made up of individual ingredients, and the ingredients could be used across many different recipes as needed.
An example of this is our initSession code snippets and explanation for iOS and Android (see the markdown file here). This snippet of code is required to build many different types of features, as described in recipes, ranging from deep linked smart banners to sharing features in apps.
In order for us to use this snippet of documentation in a new recipe, we simply need to employ the Liquid template tags to drop it in:
You can see an example of this in the section ‘Optional: Configuring the Client for Deep Linking’ in the smart banner recipe here.
This way, if we ever wanted to change the initSession code snippets, we only need to do it in a single place, and Jekyll automatically updates it across all of our recipes.
Custom overrides: sometimes you just need to tweak it a little
So, let’s say you wrote a super awesome ingredient and you’ve used it in 10 different recipes already, but it just doesn’t quite work with that new recipe you’re working on. This is where our override system comes in handy.
In this case, we’d recommend labeling the various ‘adjustable’ sections in your ingredient with some override tags. For example, take a look at this ingredient for the automatic events that Branch tracks. We’ve labeled the header with the following Liquid tags, This tells the templating engine that this a section is eligible for override:
Now, in the recipe, you can drop in this ingredient but customize the header. In the following example in the recipe for our incentivized referral recipe, we’ve completely removed the title:
Then, when Jekyll builds this recipe, the title will be removed. You could also choose to use a different title if you’d like.
Protips: when you really need to make a point
We find that there are some questions that keep coming up, again and again, no matter if a developer reads the documentation. We decided to drop all of these important points into Protips throughout the documentation using our custom built “Protip” Liquid tag.
To use them, simply drop in the set of tags seen in the below example for identifying users. You can see the source code that includes this tip here.
{% protip title='Tip: Identify your users!'  %}
You should [identify your users](/domains/configuring_client_apps//#identifying-your-users) so that you know who is sharing--and who is effectively driving the most installs and engagement. {% endprotip %}
That ugly snippet of tags turns into this beautiful tip. You’ll also note an example of linking to other docs pages here as well.

Image formatting: because full-width images are an eyesore
All great documentation includes some screenshots or diagrams to help illustrate a difficult point. Unfortunately, the markdown doesn’t allow for dynamic alignment and responsive sizing, so we built a workaround using Liquid template tags.
If you’d like to show an image in the markdown (ingredients or recipes), you simply need to use the following format:
{% image src='/link/to/img.png’ size_descriptor alignment_descriptor alt='alt text' %}
A great example page is the developer update, which has a couple different examples of image formatting. You can see it live here.
To achieve a right-aligned, half-width image in this file, we simply use this Liquid tag:
{% image src='/img/reference/developer_updates/leaving_facebook.png' half right alt='Leaving Facebook' %}

For the size descriptor, you can use:
- full
- 3-quarters
- 2-thirds
- half
- third
- quarter
- actual
For the alignment descriptor, you can use:
- nofloat
- right
- left
- center
React components: adding tabs inline
As mentioned above, we are big fans of React and use it for our entire dashboard portal. We’re trying to find more ways to use it, so naturally, we had to extend our documentation project to support it.
With the onset of Swift, we’ve found that we’ve had to double the code snippets to support both languages. We want to only modify the code snippet but leave the rest of the page unmodified – a perfect fit for React.

To use the code-switcher, you simply need to specify this set of Liquid template tags into your ingredient. You can see an example on the initSession ingredient page.
{% tabs %}
{% tab objective-c %}
{% highlight objc %}
- (BOOL)application:(UIApplication *)application didFinishLaunchingWithOptions:(NSDictionary *)launchOptions {
{% endhighlight %}
{% endtab %}
{% tab swift %}
{% highlight swift %}
func application(application: UIApplication, didFinishLaunchingWithOptions launchOptions: [NSObject: AnyObject]?) -> Bool {
{% endhighlight %}
{% endtab %}
{% endtabs %}
In case you’re interested or would like to tweak it for your own project, we’ll go ahead and share what we did to build it. First, we built a Jekyll plugin (see tabs.rb in the _plugins folder here) that looks for the tabs and tab tag, then dynamically inserts the tab React component defined in the project (see the Tabs.jsx file in the js/components folder here).
Building a recipe: putting the ingredients together
Once you’ve written the various ingredients for your project, putting them together in a recipe is very simple. I wrote briefly about how to drop them in above, but I wanted to describe how to properly assign all the necessary frontmatter for your ingredient to show the proper platforms, and have the correct title in the sidebar.
At the top of all recipe files, you can specify the customizations for that particular guide. In this example, we’re formatting the recipe page for Sharing & Deeplink Routing, which can be seen in all its glory here. The tags are pretty self-explanatory, so for the sake of brevity, I won’t over-document them.
---
 type: recipe
 title: "Sharing & Deeplink Routing"
 platforms:
 ios
 android
overview: "This quickstart guide will walk you through the minimum setup for an SDK integration. With only a few lines of code you'll have the ability to track installs by platform, campaign, etc. You can then also create links from the dashboard or add another line of code to programmatically create links via the SDKS."
---
After that, you can start writing your recipe below the triple dash. You should incorporate all of your ingredients into a beautiful composition.
Note that any h2 or h3 header will be incorporated into the Table of Contents.
Sidebar organization: clean it up
After writing all of our recipes, we found that our sidebar needed a bit of organization and formatting, so we built a React widget to help us manage the display and formatting of this component. It makes it extremely simple to customize the layout of and labeling of the sidebar.
Simply visit the sidebar.yml to make edits to your layout. You can add as many sections as you want, and customize the types of links present in the section. For example, you might want to have all your recipes at the top but present a subset of commonly used ingredients in the section below for reference.
As an example, here’s how we added the following section to the dashboard.
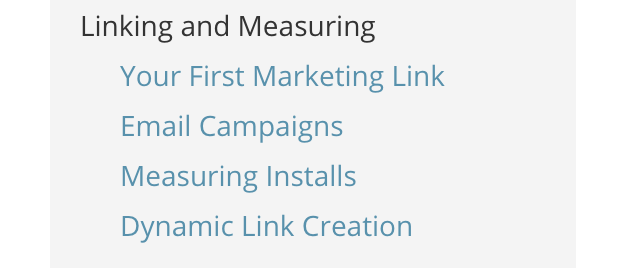
To add a new section, you just need to put a section header with the type of documentation items that will be used in that section. Then you can list the actual file names without the extension in the section below. Here is the snippet used to create the above sidebar, which can be found in this file.
- type: recipe
title: Linking and Measuring
pages:
- your_first_marketing_link
- email_campaigns
- measuring_installs
- dynamic_link_creation
Reference pages: populating from remote READMEs
Maybe you are too lazy to copy and paste, and you just want to reference a remote markdown file so that any changes made on that file are easily reflected in a new documentation build. We built a tag to support this, which dynamically retrieves the remote content and populates it in the static site.
In our case, we have a bunch of repositories for our native and web SDKs that all contain the gory details of every single method and argument necessary. We wanted them to appear in the same portal as the rest of our well-composed guides. An example would be the iOS reference link seen here. It’s a replica of our actual iOS repository README, seen here.
To accomplish this, we created a liquid tag that processes our external READMEs.
{% reference Branch-iOS-SDK/README.md %}
The reference tag finds the specified file that we submoduled into our _includes directory. that transforms the file to play nicely with our other liquid tags and flavor of markdown as well as transforming the relative paths to absolute paths.
You can see an example of this here and view the plugin here.
Conclusion
This is a super in-depth look at the structure and formatting of our documentation portal project. If you’re a Branch dev and see some typos or errors, just make a pull request on that main repository. If you’re a fledgling startup, looking to build out a robust developer documentation portal, fork the repo and the Branch content and replace it with your own.
As always, we’re here to help – just shoot us a note at [email protected]. Let us know what we can do for you.

